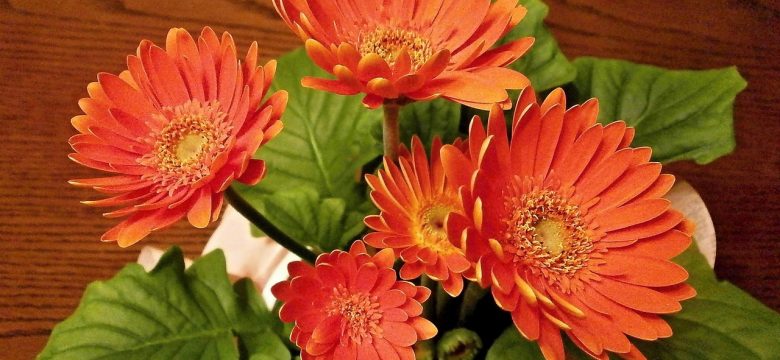
Gerberas are beautiful flowering plants that require regular repotting and pruning to ensure their health and beauty. Repotting involves transferring the plant to a new pot with fresh soil, while pruning involves trimming and shaping the plant to maintain its shape and size. In this article, we will provide you with step-by-step instructions on how to repot and prune gerberas effectively.
Repotting gerberas is necessary when the plant outgrows its current pot or when the soil becomes compacted. To begin, choose a pot that is slightly larger than the current one, ensuring it has drainage holes to prevent waterlogging. Fill the new pot with a well-draining soil mixture, which can be created by combining potting soil, perlite, and sand. Carefully remove the gerbera from its current pot, gently loosening the roots. Place the plant in the new pot, ensuring it is positioned at the same depth as before. Fill the remaining space with the soil mixture, pressing it down gently. Finally, water the plant thoroughly to help settle the soil.
Pruning gerberas is essential for maintaining their shape and promoting healthy growth. Start by removing any spent flowers, cutting them back to the base of the stem. This will encourage the plant to produce new blooms. Additionally, trim any leggy stems, cutting them back to a healthy node. This will help the plant maintain a compact and bushy appearance. Finally, shape the plant by removing any damaged or overcrowded stems. By following these pruning techniques, you can ensure that your gerberas remain vibrant and beautiful.
Choosing the Right Pot
Choosing the right pot is essential when it comes to successfully repotting gerberas. The pot you choose will have a direct impact on the plant’s overall health and growth. Here, we will discuss the ideal pot size, material, and drainage requirements for gerberas.
Ideal Pot Size: Gerberas prefer pots that are slightly larger than their current container. A good rule of thumb is to choose a pot that is 1-2 inches larger in diameter than the current pot. This will allow the plant’s roots to have enough room to grow without being overwhelmed by a large pot.
Ideal Pot Material: When it comes to pot material, terracotta or clay pots are recommended for gerberas. These materials provide good drainage and allow for the roots to breathe. Avoid using plastic pots as they tend to retain moisture, which can lead to root rot.
Drainage Requirements: Proper drainage is crucial for gerberas as they are susceptible to root rot if their roots sit in waterlogged soil. Ensure that the pot you choose has drainage holes at the bottom to allow excess water to escape. You can also place a layer of gravel or broken pottery at the bottom of the pot to further enhance drainage.
By selecting the right pot size, material, and ensuring proper drainage, you are setting the foundation for healthy and thriving gerberas. Now that you have a better understanding of the pot requirements, let’s move on to preparing the soil for repotting gerberas.
Preparing the Soil
Preparing the right soil mixture is essential for the proper growth and development of gerberas. In order to create a well-draining and nutrient-rich soil mixture for your gerberas, follow these steps:
- Start by selecting a high-quality potting mix specifically formulated for flowering plants. Look for a mix that is well-draining and contains a balanced blend of organic matter, such as peat moss or compost, and inorganic materials like perlite or vermiculite.
- In a clean container or bucket, combine the potting mix with an equal amount of perlite or vermiculite. This will help improve drainage and prevent the soil from becoming compacted.
- Add a slow-release fertilizer to the soil mixture according to the package instructions. This will provide your gerberas with a steady supply of nutrients over time.
- Thoroughly mix the ingredients together until they are well incorporated. This will ensure that the nutrients are evenly distributed throughout the soil mixture.
- Before planting your gerberas, moisten the soil mixture slightly to ensure that it is evenly moist but not overly saturated. This will create an ideal environment for root growth.
By following these steps, you can create a well-draining and nutrient-rich soil mixture that will support the healthy growth and development of your gerberas. Remember to always use high-quality ingredients and ensure that the soil is properly moistened before planting.
Repotting Gerberas
Repotting gerberas is an important task to ensure the health and vitality of these beautiful flowering plants. This section will guide you through the process step by step, making it easy for even beginners to successfully repot their gerberas.
The first step in repotting gerberas is to carefully remove the plant from its current pot. Gently tap the sides of the pot to loosen the soil and roots, then carefully lift the plant out. Be sure to handle the plant by the base or root ball to avoid damaging the stems or leaves.
Next, it’s time to prepare the new pot for your gerbera. Choose a pot that is slightly larger than the current one, as gerberas prefer a bit of extra space for their roots to grow. Make sure the new pot has drainage holes to prevent waterlogged soil.
Before transplanting the gerbera into the new pot, it’s important to prepare the soil. Create a well-draining mixture by combining equal parts potting soil, perlite, and sand. This will provide the ideal growing conditions for your gerbera.
Once the new pot and soil are ready, gently place the gerbera into the pot, making sure the root ball is centered. Fill in the gaps with the prepared soil mixture, pressing it down lightly to secure the plant. Avoid burying the stem or leaves too deeply, as this can lead to rot.
After repotting, water the gerbera thoroughly to help settle the soil and hydrate the roots. Place the pot in a location that receives bright, indirect sunlight and continue to care for your gerbera as usual.
By following these simple steps, you can repot your gerberas with confidence, promoting their growth and ensuring their long-term health.
Removing Dead or Diseased Roots
Before repotting gerberas, it is crucial to inspect the roots for any signs of disease or decay. Healthy roots are essential for the overall health and vitality of the plant. This subsubheading will guide you on how to identify and remove dead or diseased roots, ensuring the plant’s well-being.
Here are the steps to effectively remove dead or diseased roots:
- 1. Carefully remove the gerbera from its current pot.
- 2. Gently shake off excess soil to expose the roots.
- 3. Inspect the roots for any discoloration, softness, or foul odor.
- 4. Using clean and sharp pruning shears, cut off any dead or diseased roots.
- 5. Make clean cuts, ensuring that there are no ragged edges or tears.
- 6. Dispose of the removed roots to prevent the spread of disease.
- 7. After removing the dead or diseased roots, the remaining healthy roots can be repotted into a fresh pot with new soil.
By removing dead or diseased roots, you are promoting the plant’s overall health and preventing the spread of potential diseases. This process allows the gerbera to focus its energy on new root growth and thriving in its new pot.
Properly Positioning the Plant
When repotting gerberas, it is crucial to position the plant correctly in the new pot. Proper positioning ensures that the plant has enough space to grow and allows for optimal nutrient absorption. Here are some tips on how to position the plant at the right depth and angle to promote healthy growth:
- Choose a pot that is slightly larger than the current pot to allow for root expansion.
- Fill the new pot with a well-draining soil mixture, leaving enough space at the top for the plant.
- Gently remove the gerbera from its current pot, taking care not to damage the roots.
- Place the plant in the new pot, making sure that the top of the root ball is level with the rim of the pot.
- Position the plant in the center of the pot, ensuring that it is upright and not leaning to one side.
- Fill in the gaps around the root ball with additional soil, gently firming it down to provide stability.
- Water the plant thoroughly after repotting to help settle the soil and eliminate air pockets.
By following these tips, you can ensure that your gerbera is properly positioned in its new pot, allowing it to thrive and grow beautifully.
Pruning Gerberas
Pruning is an essential task for maintaining the shape, size, and overall health of gerberas. By removing spent flowers, cutting back leggy stems, and shaping the plant, you can ensure that your gerberas thrive and continue to produce beautiful blooms.
Removing Spent Flowers: To encourage continuous flowering, it’s important to remove spent flowers from your gerberas. This process, known as deadheading, involves cutting off the faded blooms just above the first set of leaves. By doing so, you redirect the plant’s energy towards new growth and the production of fresh flowers.
Cutting Back Leggy Stems: Gerberas can sometimes develop long, leggy stems that detract from their overall appearance. To address this issue, you can trim back these stems to promote a more compact and bushy growth habit. Use clean, sharp pruning shears to cut back the leggy stems to a desirable length, just above a set of healthy leaves.
Shaping the Plant: Pruning also allows you to shape your gerberas and maintain their desired form. If you notice any irregular growth or branches that are crossing or rubbing against each other, you can carefully remove them to improve the plant’s structure and aesthetics. Remember to always use clean and sterilized pruning tools to prevent the spread of diseases.
By following these proper pruning techniques, you can help your gerberas stay healthy, compact, and visually appealing. Remember to prune your gerberas regularly, especially during the growing season, to ensure optimal growth and abundant blooms.
Caring for Repotted and Pruned Gerberas
After repotting and pruning gerberas, it is crucial to provide proper care to ensure their continued growth and blooming. Here are some guidelines on how to care for repotted and pruned gerberas:
- Watering: Gerberas have specific watering needs, and it is important to water them properly to prevent overwatering or underwatering. Water the plants when the top inch of soil feels dry to the touch. Avoid getting water on the leaves to prevent fungal diseases.
- Fertilizing: Regular fertilization is necessary to promote healthy growth and abundant blooms. Use a balanced fertilizer with equal amounts of nitrogen, phosphorus, and potassium. Apply the fertilizer according to the manufacturer’s instructions, usually every 4-6 weeks.
- Sunlight: Gerberas require adequate sunlight for optimal growth and blooming. Place them in a location where they can receive at least 6 hours of direct sunlight each day. If growing indoors, place them near a south-facing window or use artificial grow lights.
By following these care guidelines, you can ensure that your repotted and pruned gerberas thrive and continue to delight you with their vibrant blooms. Remember to monitor the plants closely and make adjustments to the care routine as needed. With proper care, your gerberas will reward you with beautiful flowers for years to come.
Watering and Moisture Requirements
Gerberas are beautiful flowering plants that require specific watering and moisture conditions to thrive. Proper watering techniques are essential to prevent overwatering or underwatering, which can negatively impact the health of the plant. Additionally, maintaining the right moisture levels in the soil is crucial for the overall well-being of gerberas.
When it comes to watering gerberas, it’s important to strike a balance. These plants prefer consistently moist soil, but they don’t like to sit in waterlogged conditions. Overwatering can lead to root rot and other diseases, while underwatering can cause the plant to wilt and suffer from dehydration.
To water gerberas properly, follow these guidelines:
- Check the moisture level of the soil before watering. Stick your finger about an inch into the soil to see if it feels dry or moist.
- If the soil feels dry, it’s time to water. Use a watering can or hose with a gentle spray attachment to water the plant.
- Water the soil directly around the base of the plant, avoiding the leaves and flowers. This helps prevent fungal diseases and keeps the foliage dry.
- Water until you see water coming out of the drainage holes in the pot. This ensures that the entire root system gets hydrated.
- Allow the soil to dry slightly between waterings, but don’t let it become bone dry. Aim for a moist, but not soggy, consistency.
In addition to proper watering, maintaining the right moisture levels in the soil is crucial. Gerberas prefer well-draining soil that holds moisture without becoming waterlogged. To achieve this, consider using a soil mixture that contains perlite or vermiculite, which help improve drainage.
Regularly monitor the moisture levels in the soil by checking the top inch with your finger. If it feels dry, it’s time to water again. However, if it feels excessively moist, you may need to adjust your watering frequency to prevent overwatering.
By following these watering and moisture guidelines, you can ensure the health and vitality of your gerberas, allowing them to produce stunning blooms for you to enjoy.
Fertilizing Gerberas
To ensure healthy growth and abundant blooms, gerberas require regular fertilization. Fertilizers provide the necessary nutrients that gerberas need to thrive and produce beautiful flowers. When it comes to fertilizing gerberas, there are a few key factors to consider: choosing the right fertilizer, determining the frequency of application, and applying it properly.
Choosing the Right Fertilizer:
When selecting a fertilizer for your gerberas, it’s important to choose one that is specifically formulated for flowering plants. Look for a balanced fertilizer with equal proportions of nitrogen (N), phosphorus (P), and potassium (K). This balanced ratio will promote overall plant health and encourage blooming. Additionally, opt for a slow-release fertilizer that will gradually release nutrients over time, providing a steady supply of nourishment for your gerberas.
Frequency of Application:
The frequency of fertilizing gerberas will depend on the type of fertilizer you choose. Follow the instructions on the fertilizer packaging for specific guidelines. In general, it is recommended to fertilize gerberas every 4-6 weeks during the growing season, which is typically spring and summer. However, be cautious not to over-fertilize, as this can lead to excessive foliage growth at the expense of flower production.
Proper Application Technique:
When applying fertilizer to gerberas, it’s important to distribute it evenly around the plant’s root zone. Avoid direct contact between the fertilizer and the plant’s stems or leaves, as this can cause burning. Gently work the fertilizer into the top layer of soil using a garden fork or trowel, taking care not to disturb the roots. After applying the fertilizer, water the plant thoroughly to help the nutrients penetrate the soil and reach the roots.
Fertilizing gerberas regularly and following these guidelines will help ensure that your plants receive the necessary nutrients for healthy growth and abundant blooms. Remember to always read and follow the instructions on the fertilizer packaging for best results.
Providing Adequate Sunlight
Sunlight plays a vital role in the growth and blooming of gerberas. These beautiful flowers thrive in bright, indirect sunlight. When it comes to sunlight requirements, gerberas prefer around 6 to 8 hours of sunlight each day. However, it’s important to note that direct sunlight can be too intense for gerberas, especially during the hottest hours of the day.
If you’re growing gerberas indoors, placing them near a window that receives bright, indirect sunlight is ideal. South-facing windows are usually the best choice as they provide the most sunlight throughout the day. However, if you don’t have a south-facing window, east or west-facing windows can also work well.
In outdoor gardens, it’s essential to choose a location that offers partial shade during the hottest part of the day. This can be achieved by planting gerberas under the shade of taller plants or using a shade cloth to filter the sunlight. By providing the right amount of sunlight, you can ensure that your gerberas thrive and produce vibrant, long-lasting blooms.
Frequently Asked Questions
- Q: How often should I repot my gerberas?
A: Gerberas should be repotted every 1-2 years, or when they outgrow their current pot. It is best to repot them during the spring season.
- Q: What pot size should I choose for repotting gerberas?
A: When repotting gerberas, choose a pot that is slightly larger than their current pot. A pot with a diameter of 1-2 inches larger than the current pot is ideal.
- Q: How do I prepare the soil for repotting gerberas?
A: To prepare the soil, mix equal parts of potting soil, perlite, and compost. This will create a well-draining and nutrient-rich soil mixture for your gerberas.
- Q: Can I prune gerberas during the blooming season?
A: It is best to avoid pruning gerberas during the blooming season. Pruning should be done after the blooming season to promote new growth and maintain the plant’s shape.
- Q: How often should I water repotted gerberas?
A: Water repotted gerberas thoroughly, allowing the excess water to drain out. Water them when the top inch of soil feels dry to the touch, usually every 7-10 days.
- Q: Do gerberas require direct sunlight?
A: Yes, gerberas require direct sunlight for at least 6 hours a day. Place them in a sunny location, such as a south-facing window or outdoors in a spot with ample sunlight.


